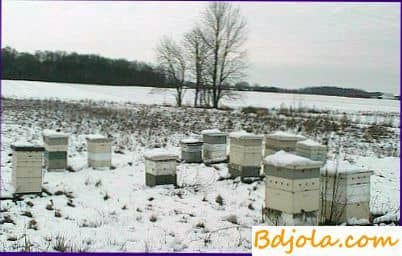
Effective shelter for bees

For eleven years now I have been using the method of warming hives, which not only ensures the complete preservation of the bee colonies, but also creates conditions that allow them to leave the hibernation practically without loss. The outcome of wintering in this case does not depend on the breed of bees and the strength of the family, the design of the hive, regional and climatic features. Due to this system of warming, it is not necessary to expand and reduce nests in autumn and spring, and also to transplant bees to other hives. The care and maintenance of families is simplified. In the nests there is no dampness and mold.
The shelter helps maintain the optimum temperature in the nest during the autumn-winter and spring periods, as a result of which bees spend their food more rationally and are in a good physiological state. Do not install heaters in the hive. Due to thermal insulation, late autumn and early spring flying of bees are possible.
The site for the construction of the shelter is chosen in a place where water does not stagnate. Its length should correspond to the number of beehives in the apiary, and the width depends on the wintering region: 70-90 for the southern regions, 120-130 cm for the northern regions.
Over the entire length of the front edge of the site, open to the south-east, I put the longitudinal bars. At a distance of 70-130cm. from them I drive in columns whose height corresponds to the height of the shields, and the distance between them is their width. In order to prevent water from falling under the hives in the spring, I make a platform with a slight inclination towards the columns.

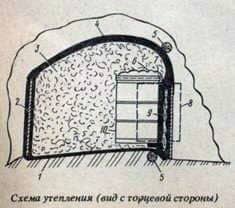
Through the entire length of the front part of the area I spread polyethylene film 1 so that the top of it hangs from the top of the bars for 20-25 cm. At the top, the hay layer is 10-15 cm thick,
Mats 9 for warming the front and rear walls of hives of 100X60X10 and 100X80X20 cm size (depending on the wintering zone) are made from reeds, hay, straw. For their mating I take nylon twine or wire. Instead of mats, foam rubber can be used.
Shields 2 make of bars length 200-250, width 90-100 cm. Only put 4 on the bars so that it overlaps them by a width of 5-6 cm from one of the sides, and along the length – by 8-10 cm both ends of the shield. On top, I press the longitudinal bars 5 and cross rails, located every 40-50 cm. To keep it from slacking, to the cross rails on the back of the boards nailed the plates.
Shields I put to the posts and wrap them on the inside with a second sheet of polyethylene film, first leading it to the first one. The space between the shields and the hives is filled with non-pressed hay 3. At the back – 10 cm above the level of the rear shields, and in front – 20-60 cm above the hives and front shields.
The third sheet of film I put on the hives and, having made the allowance before the upper tap of the lower shells, I strengthen the plates on the front walls. Then I remove the roofs along with the insulation, the pre-lapped canvas is turned off at the rear wall of the hive by 1-1.5 cm. I place the bars for the transition of the bees under it. On the pre-polished canvas I put a new one and press it to the upper frame with a metal mesh to protect the hives from the penetration of the mice. Pillow 6 I put on the grid so that it does not block the ventilation holes. The canvas is made of gauze, since they provide good ventilation of the nest.
Between the front part of the hive and the plastic film, nailed by slats (planks) above the upper flange of the lower hive shell and wrapped in the side of the rear shields, I fill the hay so that it protrudes forward by 10-20 cm. Putting on the hives a layer of hay 20- 60 cm (depending on climatic conditions, this height should decrease towards the rear shields to 1.0 cm), wrap it with two sheets of film. If they do not create a good overlap, I put one more sheet so that it covers the front shield by 15-20 cm. Over the film I put two sheets of roofing felt, one of which must cover the front panel by 15-20, 10 cm.
Hulls of the last empty hives are stuffed with hay. The thickness of the layer from the ends should be at least 20-40 cm. From the top, hay is covered with side and top sheets of film and roofing, and bottom-bottom. I press them all with shields. I close the flaps. In front I also put a polyethylene film, under which I place the mats close to each other, close to the side walls of empty hives. Wrapping the mats from the outside with a film, I bring it under the roof. Under his upper sheet I place shields that press paper and mats to the hives. The poles 5 are kept from falling by a wire stretched from the rear posts.
As soon as the snow falls, I fall asleep to them.
Effective shelter for bees
